
If you’re feeling like Jack Johnson, ready to turn the whole thing upside down, we’ve got a few yoga poses for you. Inversion yoga asanas are poses that put your heart or hips higher than your head. They even pose some potential health perks.
Here’s what you need to know about yoga inversions.
Yoga inversion poses
These are the 9 best inversion yoga asanas for all fitness levels:
- Legs-up-the-Wall
- Child’s Pose
- Standing Forward Fold
- Downward-Facing Dog
- Dolphin Pose
- Bridge Pose
- Plow Pose
- Shoulder Stand
- Headstand
This type of poses can help improve your:
- mood
- balance
- flexibility
- circulation
- self-esteem
- energy levels
- lower back and limb pain
Any type of yoga practice can boast beaucoup benefits. But NGL, there’s something special about inversion. Here’s the deal.
1. Improves your mood
Inverted yoga poses might help your body release endorphins like serotonin, norepinephrine, and dopamine. These happy chemicals can increase your energy levels and overall mood.
Studies suggest a regular yoga practice may also reduce anxiety, improve sleep patterns, and ease depression symptoms, although more research is needed.
2. Boosts confidence
Inversion poses require a lot of patience and perseverance. Research suggests that a regular practice can improve body image and self-esteem. It can also teach you that it’s OK to fail.
3. Increases circulation
Inversion poses can stimulate blood flow from your pelvis to your heart. This could boost lymphatic drainage and help deliver nutrients and oxygen throughout your bod.
Some older research suggests that inverted positions may also help lower your heart rate and allow for better oxygen uptake in your blood.
4. Reduces pain and swelling
Certain inversion poses might reduce pain and swelling in your lower back and limbs. A stable inverted stretch sesh can promote lymphatic circulation and increase blood flow to your heart. This can help reduce pain, swelling, and discomfort.
5. Improves flexibility and strength
Yoga is a fab way to increase your overall strength, balance, and flexibility. More good news? It can keep delivering these bomb bennies even as you get older.
TBH, no studies have found that inversion poses work better in this department than other types of yoga poses. But a 2016 study did find that doing Downward Dog twice a week for 10 weeks led to increased hip and knee extension.
Ready to pose the pain away? Here are the 9 best yoga inversion poses to try. We’ll start slow and work our way up to more difficult asanas (aka poses).
1. Legs-up-the-Wall
This pose is perf for peeps with lower back pain. It’s hella gentle and 10/10 relaxing.
How to do it:
- Place a folded towel on the floor, close to a wall.
- Sit on the towel and lie with your back flat on the floor.
- Scoot your booty toward the wall.
- Slide your legs until they’re straight up the wall.
- Hold for 5–15 minutes.
Pro tip: This is a great time to practice mindful breathing.
2. Child’s Pose
This simple stretch can work wonders on your hips, spine, shoulders, and neck.
How to do it:
- Start on all fours.
- Sit your butt back toward your heels.
- Fold your chest over your knees.
- Stretch arms out in front of you (or keep them to your sides).
- Gently rest forehead on the floor.
- Hold for up to 60 seconds.
Pro tip: Place a thin pillow under your forehead for added comfort.
3. Standing Forward Fold
This pose will stretch your spine, calves, and hamstrings.
How to do it:
- Stand with feet hip-width apart.
- Bring arms straight overhead.
- Open your arms to the sides and bend forward from your waist.
- Keep knee joints soft and align your hips with your ankles.
- Allow arms to dangle down toward the floor or place your palms on the floor in front of your feet if they reach.
- Hold for up to 1 minute at a time.
Pro tip: It’s OK if you can’t touch the floor at first. Use a yoga block to ease into the stretch.
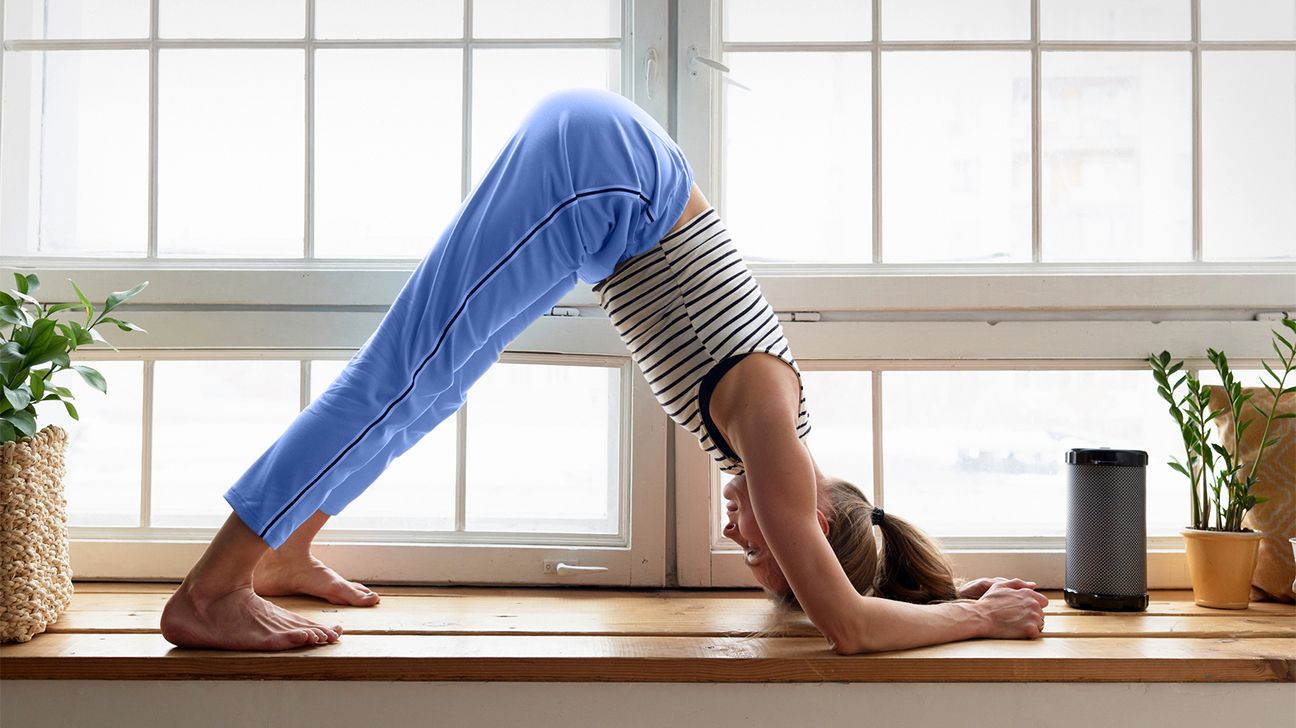
4. Downward-Facing Dog
Downward-Facing Dog is a dope way to ease tension in your glutes, quads, hamstrings, and upper back muscles.
How to do it:
- Start on all fours, with knees under hips and hands under shoulders.
- Press into your hands and the balls of your feet and lift your pelvis toward the sky.
- Straighten your arms and legs, lengthen your spine, and position your head between your shoulders. (Your body should sorta look like an upside-down V.)
- Hold for up to 1 minute at a time.
Pro tip: Make sure to distribute your weight evenly between your hands and feet.
5. Dolphin Pose
This takes Downward-Facing Dog to the next level 🐬.
How to do it:
- Start in a forearm plank position, with both legs extended so your body is horizontal.
- Gaze down toward the mat and relax your neck.
- Walk your feet toward your hands and lift your hips toward the sky.
- Hold for up to 30 seconds.
Pro tip: Make sure your spine is aligned and keep your legs as straight as possible.
6. Bridge Pose
Here’s where things start to get a bit more intense. But don’t worry! You’ll get the hang of it. This pose will stretch your chest, neck, and spine.
How to do it:
- Lie on your back with knees bent and feet flat on the floor.
- Draw your heels in toward your tailbone.
- Rest arms by your sides, palms facing down.
- Press hands, arms, and feet into the floor and lift your hips toward the sky.
- Hold for up to 1 minute.
- Slowly roll your spine back down to the floor.
Pro tip: You can also place your palms under your hips for extra support.
7. Plow Pose
This pose will stretch your spine and might even help you chill out. Just keep in mind that it can put pressure on your neck and cervical spine if your form isn’t on fleek.
How to do it:
- Lie on your back.
- Place arms at your sides and press palms into the floor.
- Bring your legs over your head.
- Let your toes touch the floor above your head (if you can).
- Hold for up to 1 minute.
- Slowly roll your spine back down.
- Repeat 1–2 times.
Pro tip: Don’t rest any of your weight on your neck. Make sure your shoulders offer the support here.
8. Shoulder Stand
This is a great lead-up to a full handstand.
How to do it:
- Lie on your back with arms at your sides.
- Bend knees and bring them toward your chest.
- Lift hips off the floor.
- Press both hands into your hips for support.
- Lift your hips and move your hands farther up your back.
- Slowly straighten legs up toward the sky.
- Hold for several seconds, then slowly lower yourself back to the mat.
Pro tip: Keep your chin tucked into your chest.
9. Full Handstand
Ready for the big leagues? Try a full handstand.
How to do it:
- Stand with left foot in front of right foot.
- Raise arms over your head.
- Place palms on the floor.
- Kick back your right leg, then your left.
- Align your body so hips and shoulders are in a straight line.
- You’re doing it! Hold for as long as possible.
Pro tip: Use a wall to help you maintain your balance.
Generally, inversion yoga is totally safe. Most folks can add it to their daily routine without any issues. But there are some things to keep in mind:
- Injuries. Inversions are the main cause of yoga-related injuries, according to a 2019 study. So start slow with simple poses and work your way up to the trickier ones. And remember… STOP if it hurts.
- Blood flow. Lots of inversion poses can cause a rush of blood to your face. Talk with a doctor before doing inversions if you have a medical condition like high blood pressure, circulatory issues, or glaucoma.
- Pregnancy. If you have a baby on board, don’t do difficult poses that invert your body, such as headstands and shoulder stands. Opt for less intense inversion poses like Downward-Facing Dog and Child’s Pose. And make sure to talk with your doc before starting a prenatal yoga or fitness routine.
Inversion yoga involves poses that place your heart or hips higher than your head. These poses bring some bonus points for your overall health and well-being. Just start off slowly with simpler poses and work your way up over time. This can reduce your risk of a pulled muscle or another injury.
Reminder: Talk with your doc before you start a new fitness routine. Also, you should prob avoid inverted poses if you’re pregnant or have certain medical conditions.